My first adventure into the world of 3D mapmaking goes back about 15 years when I fell in love with the game ‘Thunder at Cassino’. As great as the game was, it was incredibly hard for me to see the level changes due to my color blindness and the (ugly) way the map was made. So I decided to add levels to it. I purchase some foam sheets from the craft stores and with some enlarged photocopies and an xacto knife I produced a 3D airbrushed map. Unfortunately, no one ever wanted to play so it ended up moving from spot to spot in my house until it was so damaged that I finally threw it away.
Since then, I have learned a few things including what types of glue not to use, the proper tool to cut foam, the cheapest way to reproduce maps, and the order in which to build.
Here is a list of what I use to build my 3D ASL (or other game maps):
- Hot wire foam cutter
- Foam Sheets (I use 12″ x 12″ x 1/4″)
- 1/2″ MDF. I buy the 4′ x 8′ sheet at Home Depot and get them to cut it to a manageable sizes (usually 2′ x3′). Lowe’s does not carry the 1/2″ and the 3/4″ is very heavy.
- 1/2″ poplar planks for the side walls.
- 3M 77 Adhesive spray. DO NOT use too much as it will melt the foam and turn your beautiful mountain into oatmeal!!!
- Airbrush and acrylic paint(do not use enamel or oil based paint as it will melt the foam) to airbrush the white edges of the foam (skip this step if you don’t mind the white edges).
- Self healing cutting mat
- Xacto knife
- Chop saw
- Table saw
- Router
- Wood Glue and clamps
Blue items are not required if you don’t want to put wooden walls around the map.
Building the Map
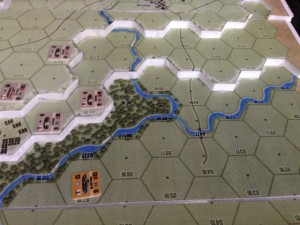
- Decide what map you would like to build. The more levels the better. You may like desert scenarios but there isn’t much point in building a 3D desert map unless there are lots of hillocks or an escarpment (actually one of my favorite maps I built was for the desert scenario ‘Point of No Return’. Prior to building the map I could never quite visualize what was really going on on those boards).
- Download VASL and the map file that you decided on in step 1. Load the map. It is very important that you zoom all the way in, otherwise the quality of the image will be very poor. Click on the orange and black German with a grenade on the left side of the VASL window and then chose ‘save map as PNG image’. Open ‘Paint’ (I have not luck opening PNG images in Photoshop so I use Paint) and pull up the image you saved. Save the image as a JPG on a thumb drive.
- Bring the thumb drive to Staples and get them to print the image as posters. You will need 1 black and white poster for every level of the map and 1 color poster for the top layer. The b&w posters cost about $3.00 each and the color poster costs around $20.00, so for a 6 layer map it will cost around $38.00 at the printshop.
- Go to Home Depot and buy a piece of MDF that will be at least an inch wider and longer than the map size. If you are buying a sheet (I suggest 1/2″), have them cut it to size right there in the store. Also buy 1/2″ poplar planks that is wider than the height of the map.
- Glue a b&w map to the MDF (this will be level 0 or the lowest level in the case of water) of the map leaving a 1/4″ MDF edge beyond the end of the map on two edges. Trim the MDF on the other two edges with a table saw so there is 1/4″ edge going around the whole board.
- Using a router with a 1/4″ blade, cut a rabbet in the bottom of the MDF board.
- Using another b&w map, cut away and discard all of the level 0 terrain leaving only level 1 and greater terrain. Glue this section of the map to foam sheets being careful not to use too much glue as it will melt the foam.
- Trim all excess foam from this section of the map using your hot wire cutter being sure not to set the temperature too high as it will melt the foam too quickly.
- Glue this section on the map to the board.
- Repeat steps 8 and 9 for all subsequent levels.
- Air brush the edges of the foam with appropriate color acrylic paint. Do not use enamel or oil based paints as it will melt the foam. Overspray is fine as all of the b&w map sections are being covered by the final color map after the airbrushing.
- Cut out each level of the color map and glue them to the 3D black and white map board starting from the lowest level (it is important to start from the lowest level to avoid getting glue and the higher levels).
- Cut your 1/2″ planks to a height that is a couple of mm’s higher that the highest point of the 3D map.
- Cut a 1/4″ groove into your planks a 1/4″ from the bottom of the plank.
- Round over the top of the planks.
- Cut the planks to fit the sides (with 45 degree edges) of the map board and glue and clamp the sides (planks) into place.
- Sand and finish (being careful not to damage the map).
Do not do the steps written in blue if you will not be adding sidewalls.